In my last post I told you that I had picked up the fabrics to start a new quilt. I've actually come along a good bit on it and today I was sewing together some sashing strips to put between the blocks. The quilt uses batik and cotton and the batik is thinner than regular weight cotton. I was having some problems with the batik fabric coming through on the bobbin side of the seam. So I made a little video to show you what I was doing and what I did to correct it. Hope it helps!

An eclectic mix of knitting, crocheting, quilting, spinning, and adventures of a dynamic mother of five. I enjoy life and pursuing what it has to offer!
Craftsy

Sunday, October 23, 2016
Saturday, October 22, 2016
Life Changes, So do We
I very nearly deleted this blog. When my mom died over a year ago, I lost all interest in most things in my life that had seemed important. The majority of my crafting was put on hold. I looked at my phone or watched television. I went back to work in September of last year as a cashier. In February I was promoted to office assistant. When June rolled around I was offered a new job as an assistant accountant. I took it. I stayed there a week. I was offered another job as a receptionist in a chiropractic office, which was more my speed, better pay, and more hours. I lost sight of what was important in my life.
I still homeschool four of my children. My oldest son moved out in January and came back with the news that his girlfriend was pregnant and due in September. My first grandson was born on August 26. He is beautiful and I'm so in love with him. They are going to get married soon. I pray for them.
Working full time, I was missing out on so much of my life. We bought a house and moved in on July 13. I couldn't even find the time to move because 90% of my day (8:30 am to 6-or-later pm) was spent at work. My kids were falling behind in some of their studies. They had a non-existent social life. I couldn't even guarantee they would make it to youth group or chorus practice on time. In reality, I was not engaged in the calling God had set forth to me. I was falling down and my family was suffering.
About a month ago I called my job and told them I wouldn't be in any longer. My husband was ecstatic and so was I! I went out and bought all the materials to make a new quilt. I also took up hand embroidery. I'm re-engaged in my children's lives, my new home is looking wonderful, and I'm re-prioritizing everything! God and family first. Enjoying life to the fullest. Making money when and where needed. Taking care of my beautiful grandson when his mommy and daddy go to work and being the best grandma I can be, because those are important to children.
So here are some highlights. These are my most precious moments to celebrate over the last month. Six Flags, buying a classic 1979 Ford Pickup for our new home, my grandson, my family, pumpkin carving, and so much more. I am so blessed that God has called me to care for my family, that he has given my husband a job where I can do that, and that I finally listened. God bless you all and stay tuned.
Wednesday, January 27, 2016
The Big Room Switch of 2016: Craft room to playroom
This actually started way back in November when my son decided that he wanted to renovate and move out into our attached carport shed. It's a fairly small room, but contains a sink, access to the main home's bathroom, and is about the size of a small bedroom. Perfect for an 18-year-old seeking some privacy and independence. Then about a month later I hear he wants to move into the home of a friend with his girlfriend. Not much I can say or do, since he IS 18 now. I voiced my concerns, but I'm one of those moms that feel a person can only experience the world and the result of their decisions by living through them. Having moved out at 17 myself and over 1000 miles away, I didn't feel that the 30 minutes was unreasonable. So off he went.
Well that prompted "What are we to do with this room that we put so much time, money, and effort into?" My 14-year-old daughter had a suggestion: She wanted it. Hmm...this does solve some problems. We have a 3 bedroom home. One room is shared by me and my husband, of course. Another housed my youngest son, and the third contained 2 teenage girls and 1 preteen. This third bedroom is also the biggest and the Master bedroom. My husband and I had used the smallest bedroom for the last 4 years, choosing to give the space to our 3 daughters. I also had the second largest room in the house, which I was using for my craft room. That left one other room, that was now open. The playroom. When my oldest son moved out, my youngest son was able to move his toys into his own room. Oh, the possibilities!
We decided between the 6 of us that my daughter could take the shed. My other twin would take the craft room. The craft room would move into the playroom/sun room area. My husband and I would take the Master bedroom, and my preteen could have our room. This was going to take some time.
The sun room/playroom needed renovation. The carpet that had been in it was urine soaked from my dog's puppy days and her occasional need to just go in there and pee. We took that out along with the padding. Underneath was some press board sub-flooring that was ruined from condensation on the windows and the urine. So my son and I (mostly I) began removing the sub-floor which took about 2 days. After removing the tar paper, I found that the boards underneath were in really great shape. They needed some filling, a little repair in some places, and painting. However, the cost was reasonable to do this, so we did it.
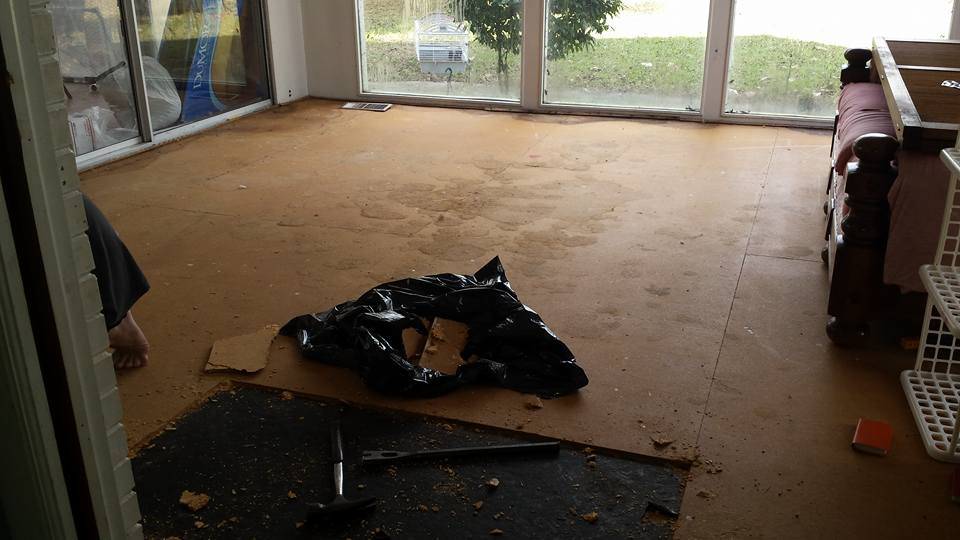


The windows in this room were terrible about drafts and keeping out the cold/heat. They also had a tendency to get a lot of condensation from drastic temperature differences inside and outside of the home. This caused the condensation to drip down onto the floor and window frames, thus causing mildew problems. The outsides had caulking, thankfully, but the insides had nothing. So after filling in the boards on the floor with backer rod and caulking, I caulked the insides of all of the windows. It worked! No more condensation. I also put weatherproof plastic sheeting over the windows to help with the heating issues. Now to paint!


I used some Olympic Assure that has a mildew block. It turned out wonderfully in the medium gray that I chose.
That was the easy part compared to moving everything from the craft room into the smaller sun room. I had a lot! But we managed, I consolidated and eliminated, and now it just needs a little more work and sorting to be finished. Anyone want some fabric?


I plan to scrape off the old white paint on the bricks (this was at one time the exterior of the house) and paint it a soft yellow. It was the same yellow my mom used in her kitchen. I think it will be lovely and add a bit of color and brightness to the room. And a bit of my mom, as well.
Look for more posts on the other rooms!
Wednesday, July 29, 2015
Bunny updates and Spinning Info
The babies are getting bigger fast! I recently took one to the vet for a check up and flea preventative. She already weighs 3 pounds! They are 12 weeks old now. I picked up a new hutch for Peter, because we all know how rabbits are and this guy will be no exception. No accidental litters here. :O. Yesterday I brushed them all out and got them looking so cute. Even Easter allowed me to trim down her legs and get some mats out. She wouldn't allow me to take a picture, though. That was just too much for one day.
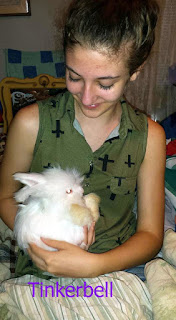
So here they are at their 12 week debut!
I've also been working on some more alpaca and spinning some Tunis fleece for my contracts. I have come to love alpaca. I think I do it differently than most people, though. I love to card it and spin it woolen, which to me enhances the softness and spring of the fleece. But I don't spin woolen like most people. I strive for a uniformity that doesn't usually come with woolen spinning and to achieve that I use a draft and hold technique. I'm thinking a video may be in order to explain this.
So here they are at their 12 week debut!
 |
| Wendy Darling |
 |
| Peter Pan |
 |
| Tinkerbell |
In other news, we're gearing up for a new school year. This is always an exciting time for me. I can't wait for school to start so that I can spring the new curriculum on my kids and see what they think about it! Of course, I'm dreaming if I think they'll ever be as excited about it as I am, but it's good to dream.
Wednesday, July 1, 2015
Working Through It All
Two weeks ago today, I lost a good bit of the magic in my life. My mom passed away. She was only 57. She woke up in the morning with a migraine headache. Nothing that she hadn't had or dealt with since she was a child. She got sick and called my stepdad in to help her. She told him she felt numb on one side of her body, then she passed out. He called 9-1-1 and she stopped breathing. That was the last time her breath ever came. My mom died of an aneurysm.
It has been very difficult for me these past 2 weeks. My mom was my biggest fan. She encouraged me to write and create and told me she marveled at what I could do. I don't believe I was or will ever be as good as she thought I was, but that is a mom's job. To believe in their children. And she did that very well.
About 3 weeks ago I told her I was getting some new baby bunnies. She was very excited for me and wanted very much to see them. I had been struggling with what to name them, wanting to maintain my fairy tale theme. But I was getting 1 boy and 2 girls, and there are very few trios in history like that.
So when my mom passed, I wanted to honor her in some way. I have named sewing machines and spinning wheels after the beautiful and creative women in my life. But I didn't have anything that was new and fitting for my mom. And while it may seem silly to some to name tools and animals after people, these tools and animals mean a lot to me. They are things with which I am involved on a daily basis and put much love and care into. Especially the animals.
Knowing how much my mom wanted to see these babies, I thought it only fitting that one get her name - Wendy. And that, of course, finally revealed to me what I should name the 3. Peter, Wendy, and Tinkerbell. As fate would have it, they all 3 live up to their names.


So while my heart aches, and I've picked up the phone to call her at least 20 times in the last 2 weeks, I pray that she is smiling down at me and loving the new babies. She left behind 3 children that loved her dearly, a devoted and loving husband, and 2 little dogs. One of them, dear little Teek, she rescued from an abusive situation and the little dog loved her beyond belief. My mom was a wonderful person. So full of love for others. Her presence in this world was a blessing to so many. I seem to miss her more as the days go on. But each time I miss her I snuggle these new babies and remember her love for animals and for me. And I will care for them and love them as they deserve.
Sunday, June 7, 2015
"New" tech toy for pattern writing
My mom loaned me a new tech toy this week. It's one of those Dragon Naturally Speaking headsets with the software. I'm not sure if it saved me any time yet, because I'm still "training my Dragon." There are a lot of abbreviations in knitting that I have to train it to recognize. Seems to recognize my voice just fine, but some of the terms that I use seem to be a little confusing for it. However, it was a lot easier to speak what I needed to type instead of trying to type it all in and going back and forth between the page and the program.
I have wanted one of these for a very long time. Always thought it would be cool to be able to dictate my stories instead of typing them in. I think once we both get the hang of it will be a lot easier. I'm actually writing this post using it! so just put a little plug-in for the Dragon Naturally Speaking, with a little training and effort it can make things a lot easier.
No, I am not trying to sell Dragon. I just think the coincidence of my business name being Mystical Beast and to be speaking in a "Dragon voice" is really wild. I think it also gains extra points because many pattern is named Dragon Wings. If you would like to try it out yourself, I put the link to it above. I will get a little change from Amazon if you buy it.
I just finished up the test knit for, "Bells and Lyres." Hoping to make final adjustments to it and send it off to my Ravelry pattern group sometime tomorrow. I'm also hoping to finish photographing Kitty I get it uploaded to my Etsy store. Kitty has been ready for a while now, but with all of the alpaca spinning I haven't had a chance for pictures yet. So look for in the next couple of days!
Friday, June 5, 2015
They're so fluffy!
I've been looking to increase my little rabbitry - and therefore wool production - since I got Easter, my first angora. I drove 6 hours to Florida and 6 hours back to pay $20 for a rescue bunny. It's been a learning experience, to say the least.
The other day I was on one of my Facebook groups looking at all of the adorable baby angoras for sale, wishing that some were closer to me. Georgia is not a great state for angoras, especially in my mid-eastern position. Too hot, I think. I was headed to a show in Augusta this weekend, just to see if someone had babies for sale. Then what to my wondering eyes did appear? Three little bunnies that all live near here!
I knew for sure I was interested in at least one of them. I excitedly sent a text to the poster and when she called back I asked tons of questions. Told her I was definitely interested in one of them, and when I showed the pictures to my husband, he told me we should get all three! Talk about an excited woman! Couldn't quit smiling the rest of the afternoon! See all the (!!!!) lined up there?
So in 3 weeks I will be making another trip to pick up 3 of these little rascals. Now, time for the cuteness overload...
They don't have names yet, of course, but the captions are their color distinctions.
The other day I was on one of my Facebook groups looking at all of the adorable baby angoras for sale, wishing that some were closer to me. Georgia is not a great state for angoras, especially in my mid-eastern position. Too hot, I think. I was headed to a show in Augusta this weekend, just to see if someone had babies for sale. Then what to my wondering eyes did appear? Three little bunnies that all live near here!
I knew for sure I was interested in at least one of them. I excitedly sent a text to the poster and when she called back I asked tons of questions. Told her I was definitely interested in one of them, and when I showed the pictures to my husband, he told me we should get all three! Talk about an excited woman! Couldn't quit smiling the rest of the afternoon! See all the (!!!!) lined up there?
So in 3 weeks I will be making another trip to pick up 3 of these little rascals. Now, time for the cuteness overload...
 |
| Red-eye white |
 |
| Pearl |
 |
| Blue |
Subscribe to:
Posts (Atom)
Craftsy

LinkWithin
