

Remember in Tuesday's knitting post that I promised a tutorial for knitting two hats on a set of double point needless? Here it is! I didn't want to do socks because there are a couple of tutorials and classes out there, the ones I'm familiar with were listed in the last post. But me and my self thought that since we had already done socks, a hat would be a breeze. No short rows for one thing! What is amazing about knitting these two at a time is that you can make a multitude of things using this method. I'm anticipating working some sweater sleeves for one thing. No more single sleeve sweaters!
I'm using a very simple hat pattern from Ravelry by Rachel Sonntag called Simple Beginner Toddler Hat. It's a basic ribbed brim and stockinette stitch in a worsted weight yearn. If you'd like to follow along with this pattern, please check out her link and download it for free from Ravelry.
Materials:

Pattern Simple Beginner Toddler Hat
4 oz worsted weight yarn in 2 contrasting colors
Size 6 dpns (or size needed to obtain gauge)
Size 6 knitting needle at least 10" long
stitch markers
Ok, once you have your pattern downloaded it is important to note the gauge. Her pattern calls for size 6 dpns and circulars. We're using 4 or 5 dpns only because it more closely relates to doing the socks later. However, you can also use this method on a circular needle. I knit loosely, so I always drop a size down. When knitting two at a time, your stitches are spaced further apart than normal too. So it is a good idea to go down one or two sizes to match the gauge. I'll be using 5 size 4 dpns.
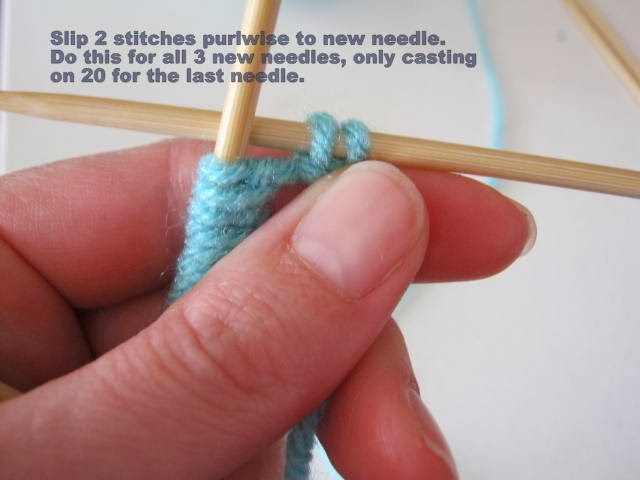
 Cast on the required number of stitches for your chosen size. I do this using the super stretchy method for the ribbing (follow link for YouTube video). I cast on to 4 of my 5 needles. When I do this I just work one or two stitches more than I need on the first needle and slip them to the next one so I'm not concerned with making a new stitch.
For example, each of my needles will have 22 stitches for a grand total of 88. I cast 24 on to the first needle, slip 2 to the new needle, and work 22 more, slipping 2, k 22, sl 2, k20. Then join.

Now for the fun part! Knit one round in ribbing. Just like a normal hat. Then when you reach the next round, we join our new yarn and second color.
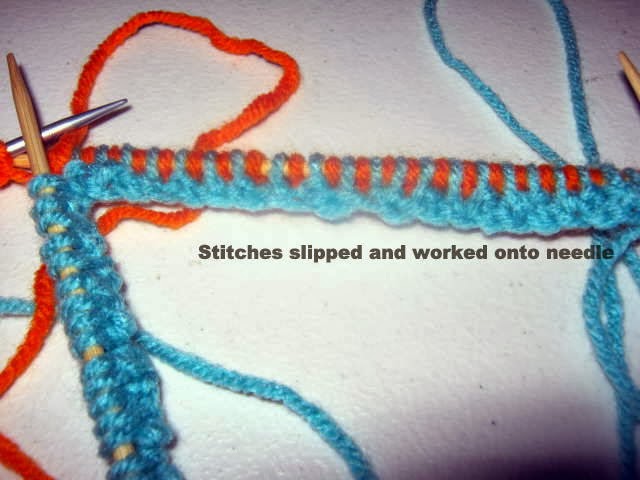
Joining the new yarn requires that you first cast on the total number of stitches (88 in this case) to a longer straight needle the same size as what you are knitting with.
 Now, holding the straight needle in back of your first dpn, slip the first stitch from your dpn purl wise. Then, knit 1 stitch from the straight needle. Slip the next stitch purl wise from the dpn (blue) and purl the next stitch. Remember to move your working yarn (orange) back to the back of your work before slipping the next (blue) stitch.


You'll only be working with 1 thread from the straight stitches. In essence, what you are doing is knitting the first row of the second color while placing the stitches onto the dpns. This works much better than trying to cast on each color initially. You're also working in k1, p1 ribbing to match the ribbing on the first row of the first color. Continue to slip stitches from the front row (blue) and working k1, p1 from the back row (orange) until all of the stitches have been worked.

Whew! That's a lot of stitching! If you've made it this far, congratulations. You've cast on your stitches and you're ready to begin the yarn acrobatics of double knitting 2 at a time.

I'm going to leave the remaining part of this tutorial for next week. Work on the ribbing, don't get frustrated, and remember that a good cup of coffee is a great cure for aggravation. If you have any questions, feel free to leave them in the comments. You can also find my pattern notes and project on Ravelry.
I'm using a very simple hat pattern from Ravelry by Rachel Sonntag called Simple Beginner Toddler Hat. It's a basic ribbed brim and stockinette stitch in a worsted weight yearn. If you'd like to follow along with this pattern, please check out her link and download it for free from Ravelry.
Materials:
Pattern Simple Beginner Toddler Hat
4 oz worsted weight yarn in 2 contrasting colors
Size 6 dpns (or size needed to obtain gauge)
Size 6 knitting needle at least 10" long
stitch markers
Ok, once you have your pattern downloaded it is important to note the gauge. Her pattern calls for size 6 dpns and circulars. We're using 4 or 5 dpns only because it more closely relates to doing the socks later. However, you can also use this method on a circular needle. I knit loosely, so I always drop a size down. When knitting two at a time, your stitches are spaced further apart than normal too. So it is a good idea to go down one or two sizes to match the gauge. I'll be using 5 size 4 dpns.
Casting On
Cast on the required number of stitches for your chosen size. I do this using the super stretchy method for the ribbing (follow link for YouTube video). I cast on to 4 of my 5 needles. When I do this I just work one or two stitches more than I need on the first needle and slip them to the next one so I'm not concerned with making a new stitch.For example, each of my needles will have 22 stitches for a grand total of 88. I cast 24 on to the first needle, slip 2 to the new needle, and work 22 more, slipping 2, k 22, sl 2, k20. Then join.
Now for the fun part! Knit one round in ribbing. Just like a normal hat. Then when you reach the next round, we join our new yarn and second color.
Joining the new yarn requires that you first cast on the total number of stitches (88 in this case) to a longer straight needle the same size as what you are knitting with.
 |
| Long straight needle with 88 stitches cast on |
Now, holding the straight needle in back of your first dpn, slip the first stitch from your dpn purl wise. Then, knit 1 stitch from the straight needle. Slip the next stitch purl wise from the dpn (blue) and purl the next stitch. Remember to move your working yarn (orange) back to the back of your work before slipping the next (blue) stitch.


You'll only be working with 1 thread from the straight stitches. In essence, what you are doing is knitting the first row of the second color while placing the stitches onto the dpns. This works much better than trying to cast on each color initially. You're also working in k1, p1 ribbing to match the ribbing on the first row of the first color. Continue to slip stitches from the front row (blue) and working k1, p1 from the back row (orange) until all of the stitches have been worked.
Whew! That's a lot of stitching! If you've made it this far, congratulations. You've cast on your stitches and you're ready to begin the yarn acrobatics of double knitting 2 at a time.

Knitting the Ribbing
For the next part we are going to work with 2 strands of yarn. Your fingers will need some training. I like to hold my yarns with my pointer finger between the two strands, working forward and backward as required. I've tried one of those finger things for stranding and they just didn't work for me. They may for you, though. This is difficult, so don't lose patience. Just keep trying different methods until you find what works for you.
For row 2, you will hold both strands of yarn to the back because you are working a knit stitch. With your strands separated, knit the first stitch from needle 1 (blue).

Move the blue strand to the front of the work. Knit the next stitch (orange), but keep the yarn to the back.

Purl the next blue stitch and leave your yarn in front as if to purl.
 Pull the orange yarn to the front of the work and make your purl stitch. Then move both yarns back to the back. After four stitches you will be in the same position that you started in, with both yarns to the back of the work and ready to make a knit stitch with the first color.

Move the blue strand to the front of the work. Knit the next stitch (orange), but keep the yarn to the back.

 |
| This should read "Keep yarn forward, knit next orange stitch" |
Purl the next blue stitch and leave your yarn in front as if to purl.
 Pull the orange yarn to the front of the work and make your purl stitch. Then move both yarns back to the back. After four stitches you will be in the same position that you started in, with both yarns to the back of the work and ready to make a knit stitch with the first color.
You will continue to do this until your piece measures what is stated in the pattern.
I'm going to leave the remaining part of this tutorial for next week. Work on the ribbing, don't get frustrated, and remember that a good cup of coffee is a great cure for aggravation. If you have any questions, feel free to leave them in the comments. You can also find my pattern notes and project on Ravelry.


No comments:
Post a Comment
Thanks for your comments! I try to respond to each and every one. Please note that all comments are moderated and it may take a little while for your comment to appear. :)